Установка jira+confluence
 Jira — это инструмент, обеспечивающий управление проектами различного типа: управление требованиями, разработка программного обеспечения, тестирование, контроль исполнения задач, учёт и отслеживание ошибок.
 Confluence — это пространство для совместной работы команды по управлению знаниями, хранению и редактированию документации. Продукты Atlassian — Jira и. Confluence — одни из самых распространённых на рынке систем управления проектами.
***********************************************************************************************************************
yum -y install epel-release
sudo yum update
############################################################################################
#Установка компонентов
sudo yum install nano lsof unzip wget mc -y
############################################################################################
#Установка FTP
sudo yum install ftp vsftpd -y
rm -rf /etc/vsftpd/* && mcedit /etc/vsftpd/vsftpd.conf
----------------------------Вставить------------------------------
# Запуск сервера в режиме службы
listen=YES
# Работа в фоновом режиме
background=YES
# Имя pam сервиса для vsftpd
pam_service_name=vsftpd
# Входящие соединения контроллируются через tcp_wrappers
tcp_wrappers=YES
# Запрещает подключение анонимных пользователей
anonymous_enable=NO
# Каталог, куда будут попадать анонимные пользователи, если они разрешены
#anon_root=/ftp
# Разрешает вход для локальных пользователей
local_enable=YES
# Разрешены команды на запись и изменение
write_enable=YES
# Указывает исходящим с сервера соединениям использовать 20-й порт
connect_from_port_20=YES
# Логирование всех действий на сервере
xferlog_enable=YES
# Путь к лог-файлу
xferlog_file=/var/log/vsftpd.log
# Включение специальных ftp команд, некоторые клиенты без этого могут зависать
async_abor_enable=YES
# Локальные пользователи по-умолчанию не могут выходить за пределы своего домашнего каталога
chroot_local_user=YES
# Разрешить список пользователей, которые могут выходить за пределы домашнего каталога
chroot_list_enable=YES
# Список пользователей, которым разрешен выход из домашнего каталога
chroot_list_file=/etc/vsftpd/chroot_list
# Разрешить запись в корень chroot каталога пользователя
allow_writeable_chroot=YES
# Контроль доступа к серверу через отдельный список пользователей
userlist_enable=YES
# Файл со списками разрешенных к подключению пользователей
userlist_file=/etc/vsftpd/user_list
# Пользователь будет отклонен, если его нет в user_list
userlist_deny=NO
# Директория с настройками пользователей
user_config_dir=/etc/vsftpd/users
# Показывать файлы, начинающиеся с точки
force_dot_files=YES
# Маска прав доступа к создаваемым файлам
local_umask=022
# Порты для пассивного режима работы
pasv_min_port=49000
pasv_max_port=55000
#включить сертификат
#ssl_enable=YES
#allow_anon_ssl=NO
#force_local_data_ssl=NO
#force_local_logins_ssl=NO
#ssl_tlsv1=YES
#ssl_sslv2=NO
#ssl_sslv3=NO
#rsa_cert_file=/etc/vsftpd/vsftpd.pem
----------------------------------------------------------
touch /etc/vsftpd/chroot_list
echo 'root' >> /etc/vsftpd/chroot_list
touch /etc/vsftpd/user_list
echo 'root' >> /etc/vsftpd/user_list
touch /var/log/vsftpd.log && chmod 600 /var/log/vsftpd.log
systemctl enable vsftpd
systemctl start vsftpd
#####################################################################################################################################
#Настройка безопастности
firewall-cmd --get-active-zones
firewall-cmd --zone=public --add-port=8080/tcp --permanent
firewall-cmd --zone=public --add-port=8090/tcp --permanent
firewall-cmd --permanent --add-port=22/tcp
firewall-cmd --permanent --add-port=21/tcp
firewall-cmd --permanent --zone=public --add-service=ftp
firewall-cmd --permanent --add-port=49000-55000/tcp
firewall-cmd --permanent --zone=public --add-service=http
firewall-cmd --permanent --zone=public --add-service=https
firewall-cmd --permanent --add-port=10000/{tcp,udp}
firewall-cmd --reload
iptables -A INPUT -p tcp --dport 10000 -j ACCEPT
setenforce 0
sed -i "s/SELINUX=enforcing/SELINUX=disabled/" /etc/selinux/config
############################################################################################
#Установка Jira
sudo mkdir /opt/atlassian
cd /opt/atlassian/
wget https://downloads.atlassian.com/software/jira/downloads/atlassian-jira-software-9.6.0-x64.bin
chmod +x atlassian-jira-software-9.6.0-x64.bin
./atlassian-jira-software-9.6.0-x64.bin
-----------------------------------------------------
Unpacking JRE ...
Starting Installer ...
Nov 01, 2016 10:49:13 AM java.util.prefs.FileSystemPreferences$1 run
INFO: Created user preferences directory.
Nov 01, 2016 10:49:13 AM java.util.prefs.FileSystemPreferences$2 run
INFO: Created system preferences directory in java.home.
This will install JIRA Software 7.2.3 on your computer.
OK [o, Enter], Cancel [c]
o*
Choose the appropriate installation or upgrade option.
Please choose one of the following:
Express Install (use default settings) [1], Custom Install (recommended for advanced users) [2, Enter], Upgrade an existing JIRA installation [3]
2*
Where should JIRA Software be installed?
[/opt/atlassian/jira]
Enter*
Default location for JIRA Software data
[/var/atlassian/application-data/jira]
Enter*
Configure which ports JIRA Software will use.
JIRA requires two TCP ports that are not being used by any other
applications on this machine. The HTTP port is where you will access JIRA
through your browser. The Control port is used to startup and shutdown JIRA.
Use default ports (HTTP: 8080, Control: 8005) - Recommended [1, Enter], Set custom value for HTTP and Control ports [2]
1*
JIRA can be run in the background.
You may choose to run JIRA as a service, which means it will start
automatically whenever the computer restarts.
Install JIRA as Service?
Yes [y, Enter], No [n]
y*
Details on where JIRA Software will be installed and the settings that will be used.
Installation Directory: /opt/atlassian/jira
Home Directory: /var/atlassian/application-data/jira
HTTP Port: 8080
RMI Port: 8005
Install as service: Yes
Install [i, Enter], Exit [e]
i*
Extracting files ...
atlassian-jira/secure/admin/views/filters/shared-filters.jsp
Please wait a few moments while JIRA Software is configured.
Installation of JIRA Software 7.2.3 is complete
Start JIRA Software 7.2.3 now?
Yes [y, Enter], No [n]
y*
Please wait a few moments while JIRA Software starts up.
Launching JIRA Software ...
Installation of JIRA Software 7.2.3 is complete
Your installation of JIRA Software 7.2.3 is now ready and can be accessed
via your browser.
JIRA Software 7.2.3 can be accessed at http://localhost:8080
Finishing installation ...
-----------------------------------------------------------
#Установка Сonfluence
cd /opt/atlassian/
wget https://downloads.atlassian.com/software/confluence/downloads/atlassian-confluence-7.19.6-x64.bin
chmod +x atlassian-confluence-7.19.6-x64.bin
./atlassian-confluence-7.19.6-x64.bin
-----------------------------------------------------
This will install Confluence 7.5.0 on your computer.
OK [o, Enter], Cancel [c]
o*
Click Next to continue, or Cancel to exit Setup.
Choose the appropriate installation or upgrade option.
Please choose one of the following:
Express Install (uses default settings) [1],
Custom Install (recommended for advanced users) [2, Enter],
Upgrade an existing Confluence installation [3]
2*
Select the folder where you would like Confluence 7.5.0 to be installed, then click Next.
Where should Confluence 7.5.0 be installed?
[/opt/atlassian/confluence]
Enter*
Default location for Confluence data
[/var/atlassian/application-data/confluence]
Enter*
Configure which ports Confluence will use.
Confluence requires two TCP ports that are not being used by any other applications on this machine. The HTTP port is where you will access Confluence through your browser. The Control port is used to Startup and
Shutdown Confluence.
Use default ports (HTTP: 8090, Control: 8000) - Recommended [1, Enter], Set custom value for HTTP and Control ports [2]
1*
Confluence can be run in the background.
You may choose to run Confluence as a service, which means it will start automatically whenever the computer restarts.
Install Confluence as Service?
Yes [y, Enter], No [n]
y*
Extracting files ...
Please wait a few moments while we configure Confluence.
Installation of Confluence 7.5.0 is complete
Start Confluence now?
Yes [y, Enter], No [n]
y*
Please wait a few moments while Confluence starts up.
Launching Confluence ...
Installation of Confluence 7.5.0 is complete
Your installation of Confluence 7.5.0 is now ready and can be accessed via
your browser.
Confluence 7.5.0 can be accessed at http://localhost:8090
Finishing installation ...
-----------------------------------------------------------
############################################################################################
#Установка PostgreSQL
sudo yum install postgresql-server
export PGDATA=/var/lib/pgsql/data
sudo postgresql-setup initdb
sudo systemctl enable postgresql
sudo systemctl start postgresql
sudo -u postgres -i
psql
CREATE USER jiradbuser PASSWORD 'jiradbpassword';
GRANT ALL ON SCHEMA public TO jiradbuser;
GRANT ALL ON ALL TABLES IN SCHEMA public TO jiradbuser;
CREATE DATABASE jiradb WITH ENCODING 'UNICODE' LC_COLLATE 'C' LC_CTYPE 'C' TEMPLATE template0 OWNER=jiradbuser;
CREATE DATABASE confluencedb WITH ENCODING 'UNICODE' LC_COLLATE 'C' LC_CTYPE 'C' TEMPLATE template0 OWNER=jiradbuser;
\q
exit
sudo nano /var/lib/pgsql/data/pg_hba.conf
----------------------------исправить------------------------------------
host all all 127.0.0.1/32 ident
на
host all all 127.0.0.1/32 md5
-------------------------------------------------------------------------
sudo systemctl reload postgresql
sudo systemctl restart postgresql
############################################################################################
#Установка Webmin
mcedit /etc/yum.repos.d/webmin.repo
---------Вставить-------------------------------------------------
[Webmin]
name=Webmin Repo
baseurl=https://download.webmin.com/download/yum
enabled=1
gpgcheck=0
-----------------------------------------------------------------
yum install webmin -y
chkconfig webmin on
service webmin start
############################################################################################
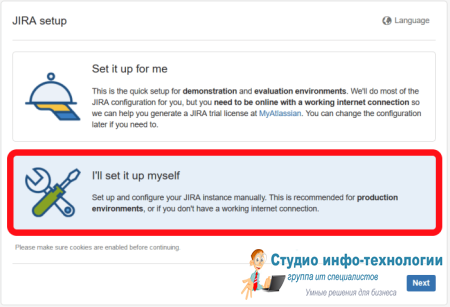
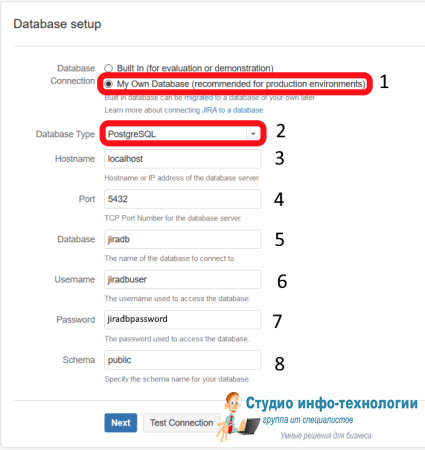
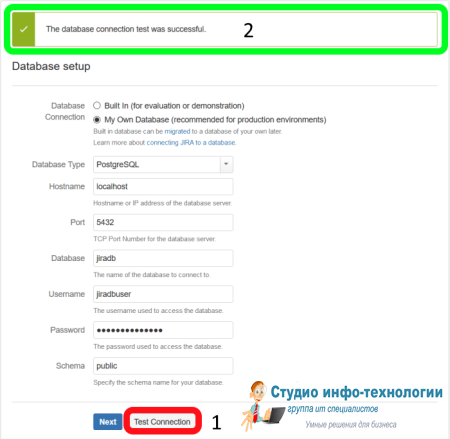
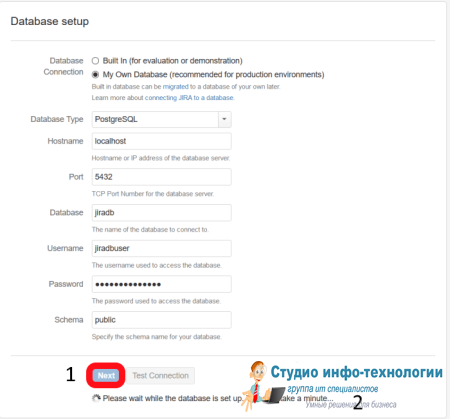
#Настройка Jira
http://ваш ip-адрес сервера:8080
 #Настройка Сonfluence
http://ваш ip-адрес сервера:8080


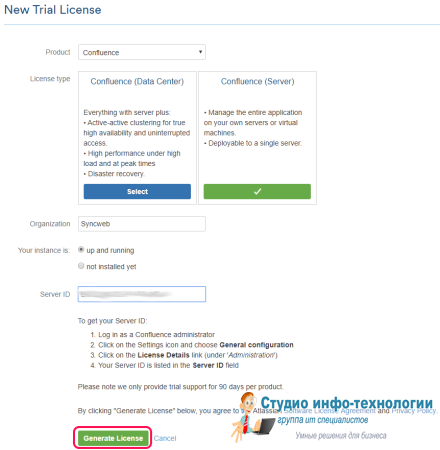
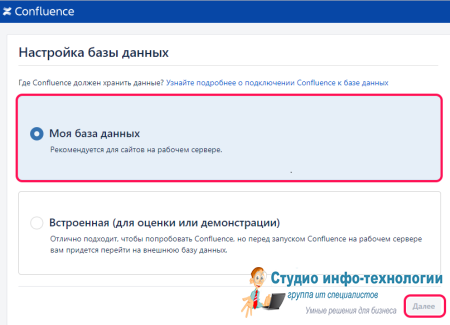


 ########################################################################################################################
 #Установка nginx
sudo yum install nginx
nano /etc/nginx/conf.d/nonssl.conf
----------------------------------------
server {
listen 80;
server_name <jiraserver>;
access_log off;
return 301 https://$host$request_uri;
}
------------------------------------
nano /etc/nginx/conf.d/jira.conf
---------------------------------------
server {
listen 443 ssl;
server_name <jiraserver>;
access_log /var/log/nginx/jira-access.log;
error_log /var/log/nginx/jira-error.log;
ssl on;
ssl_certificate /etc/nginx/ssl/jira.crt;
ssl_certificate_key /etc/nginx/ssl/jira.key;
client_max_body_size 50m;
location / {
proxy_set_header Host $host;
proxy_set_header X-Real-IP $remote_addr;
proxy_set_header X-Forwarded-Proto https;
proxy_set_header X-Forwarded-For $proxy_add_x_forwarded_for;
proxy_pass http://<IPaddress JIRA Server>:8080/;
}
}
-------------------------------------------------------------------------
nano /opt/atlassian/jira/conf/server.xml
<Connector
port="8080"
maxThreads="150"
minSpareThreads="25"
connectionTimeout="20000"
enableLookups="false"
maxHttpHeaderSize="8192"
protocol="HTTP/1.1"
useBodyEncodingForURI="true"
redirectPort="8443"
acceptCount="100"
disableUploadTimeout="true"
bindOnInit="false"
proxyName="jiraserver"
proxyPort="443"
scheme="https"
secure="true"
/>
-----------------------------------------------------------------------------------
<Context docBase="${catalina.home}/atlassian-jira" path="/jira" reloadable="false" useHttpOnly="true">
sudo systemctl restart nginx
sudo systemctl restart jira
- root от

